
Lighting for digital

In my early days of figuring out how to light and expose for digital capture, I was faced with the 'chicken or the egg' quandary; how do you create perfect lighting and exposure if you don’t know how your image is to be processed, and how do you determine optimum processing if you don’t have lighting, metering and exposure figured out? The crux of the matter is that both lighting and processing affect image contrast and tonal range. With film it was easy since the film companies had standardised film’s response to light and chemistry for us, so part of the puzzle was already complete. But in digital it was the 'Wild West' – anything goes and you are on your own (which may sound negative, but I love it, I want all the control!). Anyhow, after some heavy thinking and much heavy breathing, it occurred to me that digital is not really that much different from film; to be a successful film-shooter one needed to do film tests to figure out the correlation between film, camera, meter and processing. With this in mind I transposed what I learned from film into the digital world and found that I needed to shoot a Shirley just like I did in the 'olden days' (see sidebar entitled 'Shirley').
 2
2
Shirley: If you haven’t been in photography for too long you may be asking yourself, who is Shirley and what has she done to photographers that she deserves to be shot? Did she apply hairspray to her 'do' too near someone’s lens or did she publicly declare that photography is not really art? Well neither of these is actually the case, in fact, back in the old days of film, an ISO or sensitivity test was referred to as a 'Shirley'. So you see, a Shirley is more of a thing than a person and now you are probably wondering what on earth Shirley has to do with testing sensitivity. Well according to my lighting mentor, Dean Collins, unless he was pulling my leg, which he often did, the name Shirley comes from the old days of film at Kodak. One day a long time ago some of the technicians were setting up a test and needed a flesh-tone and so they invited Shirley, the Kodak receptionist from their department, to sit in for a few shots and so Shirley became the Kodak ISO pin-up girl.
 3
3
Finding the best exposure in the resulting images from this 'Shirley' test allows one to find the true ISO or sensitivity of their film or camera’s image sensor. Now you may well find that the sensitivity or ISO settings on your digital SLR camera are spot on, most are, so why bother? You should bother because in addition to checking to see if your camera ISO settings are accurate, you will be able to match your handheld meter with your camera and you will get a correctly exposed raw file from this Shirley test. This correctly exposed image is required to determine your optimum processing settings. Once these optimum settings are figured out, you save them as a preset, that saved preset is your default processing algorithm – now that you know how your images will be processed you can light to that standard, thus solving the 'chicken or egg' quandary.
 4
4
My Shirley or sensitivity test consists of photographing a greyscale and a recognisable flesh-tone (see Image 01) – I like to use my wife Sylvianne since I am very good at recognising her flesh. The greyscale I use is a 24 patch Macbeth Color Checker. Since these are fairly expensive (£42.50 ex VAT www. colourconfience.com – Ed.), you could get away with using the Kodak Separation Guide 21 density greyscale but the Macbeth card is manufactured to a tighter tolerance level. For a white point instead of using the white swatch on the Macbeth card or Kodak scale, I like to use a three-dimensional white point. My three-dimensional white-point is a simple inexpensive idea that a colleague of mine thought up. It is a small, rolled piece of clean, white, seamless paper. The idea of a rolled, white, semi-matte surface is that instead of it being flat like the grey scale white swatch, it has a rounded surface; that rounded surface at some point will pick up a little specularity, or in lay-person’s terminology, glare, from the main source of illumination. That specularity or glare is going to mix with the paper, brightening its whitepoint. This gives us more of a 'real-life' white point. A white wedding dress is a perfect example of this; certain areas of that dress that are on the correct angle to the light 2 source relative to camera viewing angle, will catch some specularity. Since this is not a true catch-light, most photographers would like to hold some detail in these hot areas and so set this white-point to the brightest possible value in the image capture without letting it burn-out (clip).
Having a flesh-tone in this test is not totally essential, however, it provides another real-life check – we are all very in tune with flesh-tones. In addition to my 'flesh-tone Sylvianne', I include a white blouse to give us another three-dimensional representation of a real-life white, and a black, woollen jacket, for a real-life black; both not unlike a bride’s gown and a groom’s black tuxedo.
When shooting with strobe or flash I often include a flash-meter in the shot, set to non-cord mode. This is not really necessary, however, it is a great way to confirm that each shot taken has received the correct amount of light, since strobe/flash heads can vary a little. Also I find that the meter is really handy to attach my small Macbeth Checker Card to with double-sided tape, and since this meter has a threaded hole on its back, I fasten it to the top of a pivoting head from a light stand or tripod; this makes it easy to get the best angle on the card (see Image 02).
By the way, all you really need for this test are three tones: white, mid-grey, and black. So if you don’t have the budget for a grey-scale, then substitute the grey scale with white seamless paper, a grey-card, and a black jacket like a black tuxedo.
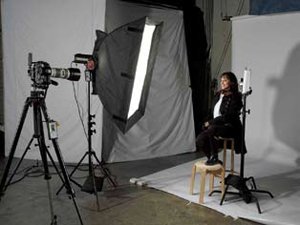
To set up lighting for this test set, I placed a softbox fairly close to the subject, but not so close that it makes it hard to keep even lighting across the subject and test targets (see Image 03). To keep things really simple I do not add a fill light, whether you do or not will not make any significant difference to the test results.
 5
5
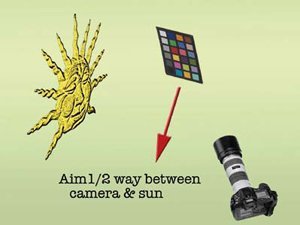
How the greyscale is angled is really important; it needs to be on such an angle that it is not picking up any glare from the main-light source. The question is, 'Where do you point the card?' The answer is, you need to aim it half way between the camera and the light source (see Image 04). Now if you want to impress your friends with how knowledgeable you are, refer to this as 'Cosine Compensation'. Placing the card half way between the camera and the light source is the optimum point. If I were to aim the card away from the camera a little and more toward the light, glare would appear on the card from the camera’s view. If I were to aim the card away from the light source and more towards the camera, the more I pivot the card, the darker it will become. So, the half way point between is the perfect position for getting the maximum amount of light without glare; this ideal positioning is the same for grey-cards as it is for grey-scales.
And so that is the set-up. This test can also be done outdoors, just think, 'What is my light-source' and set up accordingly – aim the greyscale card halfway between the lens and the sun (see Image 05 & 06). The next article will continue with our Shirley test.
