|
|
Page 2
Photographing Amber was then just a matter of my imagination and creativity taking over, remembering that the images were to be placed in a composite at the end of the day. At this point the Chromatte section of this test was complete, however, there are a few other precautions you should bear in mind when using this type of equipment.
Shiny objects such as the swords used in this exercise will pick up the green LED light in the reflection, so anyone with thick glasses may suffer with the same problem. This was overcome by not getting too close to the subject for the lights to take effect or by using a longer focal length lens. The transformer can also be reduced in power (minus 1) to reduce the strength of reflection. Because the green key works within a narrow light band, the software can ignore green tones outside of this bandwidth, effectively ignoring the reflections. In extreme cases, however, you may end up with some semi-transparency in your keyed image. Your subject should be placed fairly close to the fabric background (even touching it is OK!), to minimise shadows and make keying of the subject easier and more accurate. Extremes of lighting are also not recommended as large shadow areas can result from lopsided lighting. A ratio of 2:1 or 3:1 is acceptable.
PhotoKey 4 Pro
There are many chroma key software providers on the market but we chose PhotoKey 4 Pro from FXhome (Mac and PC compatible) and is an ideal partner to accompany the Chromatte system. One of the main advantages of this software is to save time and effort in masking and cutting images in Photoshop.
At just over £200, its not going to break the bank and is an event photographers dream. Imagine shooting with your Chromatte system and instantly importing the images into PhotoKey 4 Pro onto any background image of your choosing and printing from the same software to your printer in seconds. There is no need to adjust your normal shooting practices and keeping it simple is what its all about. We tried it on Podge Kellys corporate headshot with superb results achieved by shooting only with the available studio light and using the program defaults!
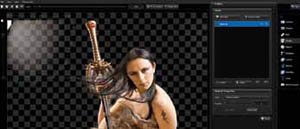
ABOVE: The interface of PhotoKey 4 Pro
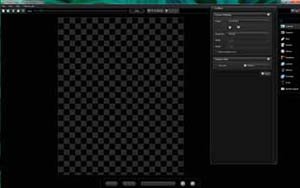
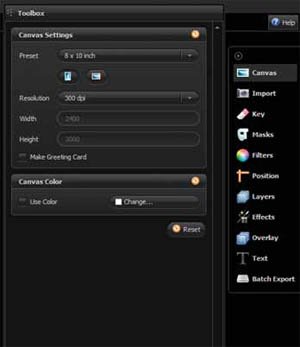
There is a nifty little plug-in for users of the 32-bit version of Photoshop on their web support page that allows you to access the program directly from CS3, 4 or 5. Sadly this is not yet compatible with the 64-bit version, so we will use the software stand alone as was originally intended for event photographers. Open PhotoKey 4 Pro and the project screen opens with the main work area, toolbox and tool selector on view. The pallets are customisable but the layout shown here is the default. The first thing to do is select a canvas size. One of the easiest ways to do this is to import the background or foreground in at their native size. Select Canvas>Presets>As Foreground or As Background. Alternatively choose one of the other handy presets. We wont go through all the panels in this review but well look at the main components.
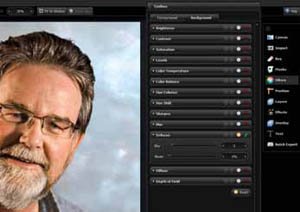
Some keying software variants leave the cut-out images looking false and unreal, as if attacked by very large scissors. PhotoKey 4 Pro has some pretty snazzy algorithms that take care of this for you by intelligently smoothing off the edges and wrapping the background light around the key to add shape and dimension automatically. This can all be fine tuned in the Key toolbox.
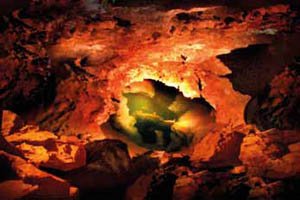
Creating the Cave Warrior
Processing the Cave Warrior shots of Amber were always going to be a little more complicated than the techniques used for event work, which we managed almost straight out of the box! However, keying the images only required a little more effort within PhotoKey 4 Pro.
For my fantasy image, I only imported the image of Amber onto the matted work area without a background image. This showed an area (top left) where some overspill had contaminated the background. This can easily be dealt with by cropping this area out, however, the software has a masking facility in addition to the keying algorithms. At present the masks can only be applied by describing a path, but future versions of the software may include a more useable brush for refining the mask, which will be a much easier option for dealing with semi-transparent areas. The mask can be used for removing or retaining the areas selected.
Rather than working on a complicated composite in the keying software, I wanted to work in my more familiar Photoshop workflow. PhotoKey 4 Pro allows you to export your keyed image in a PNG or Tiff format. This maintains the transparency necessary for compositing the image outside of the software, but does not retain the alpha channel for additional mask adjustment. When all the necessary components (background, warrior and wings) are in place, the process of blending and building the final image is completed.
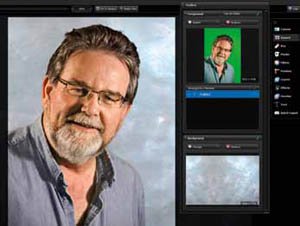
This image of Podge Kelly was cut out very quickly using the
default settings.
The images of Amber were made more difficult by the
reflections of the sword, the waving hair and clothes, and more uneven
background lighting.
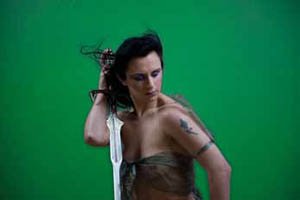
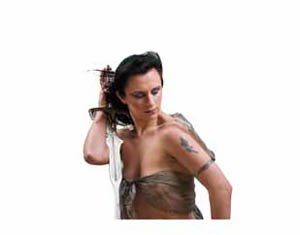

The RAW file, cut out PNG, the background and the final
composite.
How green can it be?
Curious, we showed the LED light to our ambient light
spectrophotometer to measure the colour of the output. It is typical
of its type, with a peak output close to 530nm and very little spread.
What amused us (it’s easy to do!) were the Lab values for the colour
co-ordinates. Compared with a Macbeth Chart green, they were not
on the same page as the graph and only just on the one next to that!
Small wonder that something so far out in the gamut field is easy to
isolate and cut out.
MMcN
Page 1 - Page 2 - Page 3

|
