

.

articles/Architecture/Looking-for-Moore-page2
by Tony Moore Published 01/04/2018
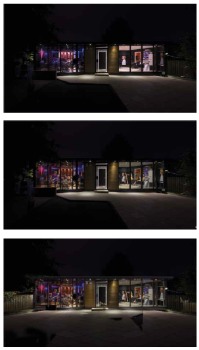
TOP: The exterior scene with the models waiting in the wings!
MIDDLE: The models are blended into place and the interior lighting is harmonised.
BOTTOM: The intruding patio wall and barbeque are removed and the patio is partly re-laid. At this stage details such as the washing line, drainage gully and burglar alarm have yet to be removed. Note, in particular, the rim lighting that has been added to the window mullions, vital in adding sparkle to the scene and typical of the detailed attention that is required to polish the shot.
The building is purpose built by a gentleman called Mikey Tracey and accommodates his sound studio on one side and his wife, Ursula’s hair salon on the other. The dog, Sam, splits his time between the two businesses and yes he was right there where you see him! Tony’s basic technique is to make an initial reconnaissance trip to plan out the shoot sequence and a proposed composite workflow. In this instance a wall directly behind the camera forced the use of a wide angle and so a full-frame Nikon was set up with a 16–35mm Nikkor at 16mm focal length. The camera position was chosen to frame up the scene, square the building off to perfect symmetry and allow a good view of the inside.
Tony starts shooting in daylight but intensifies his work from 20 minutes to around 30–35 minutes after sunset. Once the building sequences are finished he starts work on the interiors. Mikey’s three daughters, modelled in both the sound studio and the hair salon and so the shots had to be made sequentially. The lively Sam was shot separately, requiring more than 30 exposures at 800 ISO to freeze him in the dark hallway (and a pound of treats).
Model directing was accomplished from the camera so that Tony could ensure good alignment of his subjects in the mirrors of the salon. His girlfriend was used as the go-between to dash in and out and tweak the poses and positions (all very LP Hartley!). A number of other details had to be planned-in to provide ‘repair’ shots for the intruding wall, the guitar, and to paint the fence and trees with an Ice Light to enhance their tones and impact. The original shot shows just had much had to be accomplished to create the final polished image.

By this time the image development was relatively advanced, this is Layer 27 and is a Luminance Mask that was used to control the tones inside the music studio. Tony regularly uses Luminance Masks for ultimate control of this tonal values.
With the Raw files assembled, the magic can begin. The development of a finished image is rarely a straight path of sequential moves and most complex jobs require some back-tracking and even restarts. Analysing Tony’s layered Photoshop file reveals part of this process across three intermediate files, saved at different times. The highest numbered layer we can find is designated 58 so there are at least that many being used at some stage. Tony is a fan of Luminance Masks and a number of them have been used to allow fine control over the tonal ranges including individual lights within the building. It appears that some of the portions of the scene have been completed and then transferred into subsequent assemblies (note that the very latest version of Photoshop allows whole blocks of layers to be moved in one mouse move – very useful in this type of project!). Reconstruction of the lower left-hand side of the image was probably the most taxing with the low wall obscuring the guitars. The way around this problem is to shoot from ‘over the wall’ and adjust the perspective using Puppet Warp or Warp to create an object suitable for blending in as required.
There were seven main tasks to accomplish, placing each of the interior settings into the base exposure, ‘relaying’ the patio, rebuilding the bottom-left obscured detail in the music studio, placing the sky, adding the bushes and then the multiple layer moves to harmonise the colour tones and tidy up the small detail.
Some of the fine-tuning moves have quite an impact on the final image. For example, the addition of enhanced lighting to the mullions of the windows punches well above its weight in adding pop to the final image. Examining the detail in layers, alpha channels and adjustment layers brings home the amount of work required to take a straight architectural recording of a building into a piece of wall art. The very last adjustment was made using Nik Filters Pro Contrast from ColorFX 4. The final output was a 60-inch metallic acrylic from the Loxley Colour ‘Acrylic Gallery ‘range.
There are 0 days to get ready for The Society of Photographers Convention and Trade Show at The Novotel London West, Hammersmith ...
which starts on Wednesday 14th January 2026


Society of International Commercial and Industrial Photographers (SICIP) is a trading name of BPPA Ltd
The Society of Photographers
Clwyd Chambers, Clwyd Street, Rhyl, Denbighshire, LL18 3LA
BPPA Ltd Company Reg 0392 2894
VAT number 790 4289 05
Tel: +44 1745 356935


Home Page - Find a Photographer - Benefits of Membership - Professional Imagemaker Magazine - FREE information pack - Privacy - London Photography Show Europe's Largest 'All-Welcome' Photographic Convention
Newsletter
Subscribe to the Societies Newsletter. Subscribe here.