

.

articles/Photoshop/removemega-page1
by Jane Conner-ziser Published 01/08/2009
Photoshop Tutorial by Jane Conner-ziser
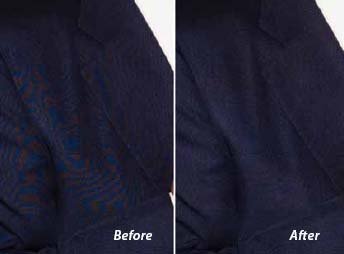
What is moire and how do you prevent or remove it?
Moire is a repetitive pattern of wavy lines or circles that occasionally appear on objects in digital captures. It occurs when fi bers or fi ne parallel details in an object match the pattern of the imaging chip in the camera. Some camera companies incorporate anti aliasing fi lters in the cameras to slightly blur the tiny detail areas of captures, but other manufacturers prefer not to use them because they don't want to sacrifi ce image sharpness. With or without the fi ltering, every digital camera is capable of creating moire.
Camera angle, lens focal length, camera position and focus point can all contribute to moire so changing any of these in a circumstance where you see moire can eliminate it. On the job it's hard to do because you have to view the images at 100% in order to see it correctly.
So, you can have a great camera and do everything correctly and still see moire once in awhile. It can usually be corrected by duplicating the background, blurring the copy and changing the layer's blending mode from Normal to Color, BUT - Today we had a challenge; some of the most distinctive moire I've ever seen. I tried everything. Every tried and true method of moire removal minimised it somewhat but nothing even came close to an acceptable fi x. In RGB, the moire was visible in every colour channel. In Lab Color, it was visible in both colour channels PLUS the lightness channel.
However, it is said that perseverance pays off and we weren't going to let it go. In the end I combined a couple of diff erent techniques and come up with one that works consistently every time. Record an action of this - it's worth it!
We're assuming you are working with an RGB fi le.
1. Image / Mode / Lab Color
2. Duplicate the Background
3. Make sure the Background Copy is the active Layer
4. Open the Channels window
5. Click on the Lightness channel to make it the active channel
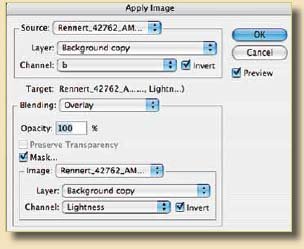
6. Choose from the Main Menu Bar, Image / Show All Menu Items / Apply Image
Choose the following settings:
Source: will be the name of your file
Layer: Background Copy
Channel: b, check Invert
Target: will be the Lightness channel of your fi le name
Blending: Overlay
Opacity: 100% - I TOLD you it was serious moire!
Check Mask to open additional options
Image: will be the name of your fi le
Layer: Background Copy
Channel: Lightness, check Invert
There are 0 days to get ready for The Society of Photographers Convention and Trade Show at The Novotel London West, Hammersmith ...
which starts on Wednesday 14th January 2026


Society of International Commercial and Industrial Photographers (SICIP) is a trading name of BPPA Ltd
The Society of Photographers
Clwyd Chambers, Clwyd Street, Rhyl, Denbighshire, LL18 3LA
BPPA Ltd Company Reg 0392 2894
VAT number 790 4289 05
Tel: +44 1745 356935


Home Page - Find a Photographer - Benefits of Membership - Professional Imagemaker Magazine - FREE information pack - Privacy - London Photography Show Europe's Largest 'All-Welcome' Photographic Convention
Newsletter
Subscribe to the Societies Newsletter. Subscribe here.