

.

articles/Commercial/creation-page3
by Dave Wall Published 01/08/2012
Your camera should be on a very sturdy tripod and locked off as tightly as possible. One knock at any stage and it is back to square one! Set your camera to 'manual everything' (that includes focus). Why? Well if your exposure varies then it will be hard to blend the images together (not impossible but difficult). Also if you have the camera set to auto focus and the camera focuses even a millimetre differently on exposures then it is back to the start again as the resulting images will be slightly larger or smaller in scale. A cable release is also a necessity.
Once your camera is 'nailed down' and everywhere is free from clutter, it is time to light No.1 on your lighting diagram. Using your cable release fire your first exposure. Tick off No. 1 on your diagram, then 'carefully' move your light to it's next position and 'carefully' make your way to your camera (avoiding tripod legs) and make your next exposure. Repeat until finished. Did you catch the phrase 'CAREFULLY' by any chance!
Miss an exposure from your diagram, nudge your camera, nudge your product, change your memory card half way through and...you guessed it. Start again!
Now this may all sound like a chore but, being honest, if you are careful and methodical it is very easy to achieve stunning results. For this signature image of my classic bike it took longer to clean the bike than to actually photograph it....No seriously!
Even so this image required 136 exposures of which 76 were used in the final composite!
Now obviously this is only half the story as at the moment we just have lots of pieces of the jigsaw we have to piece together. This is now where the magic happens.
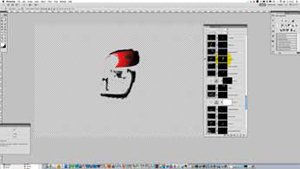
Using your RAW convertor of choice (I use Lightroom but any other will do) it is time to make your decisions on which images you are going to use. Ensure you have all your images synchronised so when it comes to piecing things together later all areas will appear seamless. Set colour temperature, contrast, etc ensuring it is the same for each image and open all the images into one document in Photoshop. (In Adobe Lightroom and Adobe Bridge this is just a simple case of highlighting all the images.
For Lightroom left mouse click and choose 'edit in' followed by 'open as layers in Photoshop'. (diagram 1) In Bridge the same tool is under Tools>Photoshop.
Photoshop will now open with a multitude of layers all in alignment (as long as you didn't nudge anything at the shooting stage).
Time to get creative!
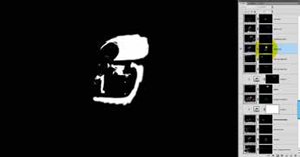
Before we start a basic understanding is required of layers and masks.
Many photographers feel out of their depth at this stage but they really needn't. Layers and masks are really quite simple but do require some explanation to start.
At present we have an image with approximately 75 images all stacked one upon another. Imagine these are actual pieces of paper; each layer obscures the layer below. To reveal a portion on the piece of paper below we would need to cut a hole in it. If we wanted to hide that portion that is now visible we would sticky tape the hole back up! The exact same rule applies within Photoshop. It really needn't be any more complicated than that.
Follow the next step of visual instructions and all should be become apparent.
There are 0 days to get ready for The Society of Photographers Convention and Trade Show at The Novotel London West, Hammersmith ...
which starts on Wednesday 14th January 2026


Society of International Commercial and Industrial Photographers (SICIP) is a trading name of BPPA Ltd
The Society of Photographers
Clwyd Chambers, Clwyd Street, Rhyl, Denbighshire, LL18 3LA
BPPA Ltd Company Reg 0392 2894
VAT number 790 4289 05
Tel: +44 1745 356935


Home Page - Find a Photographer - Benefits of Membership - Professional Imagemaker Magazine - FREE information pack - Privacy - London Photography Show Europe's Largest 'All-Welcome' Photographic Convention
Newsletter
Subscribe to the Societies Newsletter. Subscribe here.