

.

articles/Software/grisnik-page4
by Mike McNamee Published 01/12/2009
The values are measured using the Photoshop HSB values in Adobe RGB, the actual skin tones were measured (on real people) using a spectrophotometer. The average Caucasian value is that normally assumed for the GretagMacbeth Color Checker.
For the second series of shots (right) Aled applied the same initial adjustments. We found by measuring a number of his graded RAW files, including those from different studio and wedding shoots, that he consistently arrives at roughly the same skin tone values, that is 40 to 50% saturation and a hue angle of 27°, ie the area shown in the graph. Readers analysing their own work should remember that these values are in context with the rest of the image and that they apply only to Caucasians. Printing for the Asian market would demand a slightly redder, less saturated skin tone, close in fact to average Caucasian (nominally 24° hue angle and 28% saturation). The context of the image is important because this creates a bias in the way we view the colour. If, for example a bride is photographed against a green hedge, the dress and facial features will pick up a green cast. If you neutralise this the image will look too magenta (ie the complementary of green) - the eye expects the green cast because of the context of the image and this needs to be respected; this is a difference between colour correcting just on the numerical values and correcting by looking at the print!
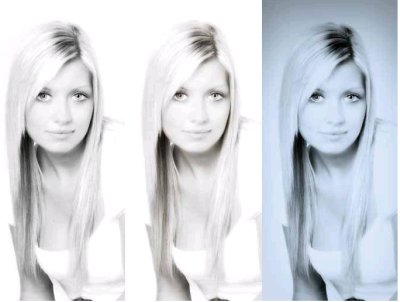
Once the file had been prepared and graded. The skin was then softened selectively using Dynamic Skin Softener before it was converted to monochrome using Nik Silver Efex Pro. Aled used a number of layer blending modes to enhance the contrast to give the very modern look to the image before cropping and colouring it with both sepia and blue. The three variants were presented as proofs to the client before a wall enlargement was made.
Some of the variants available with Nik software. Top is the graded image, then Bleach Bypass, Glamour Glow and finally a Silver Efex conversion.
Bleach Bypass, a short history
Bleach Bypass, Skip Bleach, Bleach Reduction, ENR, ACE and Silver Tint are all basically the same process that result in a distinctive high-contrast, harsh, faded look. The technique was first used in Kon Ichikawa's 1960 film Her Brother and it is not recorded whether it was discovered by accident, although it would seem a safe bet to assume so, much in the way that Man Ray discovered solarisation. All it needed was for somebody to forget to dunk the film in the bleach or for there to be an equipment malfunction during processing. Having got the effect it was a short leap to use it on stills film when making the posters for the films' advertising. The films Evita and Saving Private Ryan both exploited the effect. In the days of film it was considered risky and the insurance companies would not cover the risk if the film-makers were dunking their precious celluloid in some magic brew or other! Digital has changed all that and there are a number of ways of accomplishing the effect in Photoshop or by using plug-ins such as Nik ColorEfex Pro or onOne software.
The single defining characteristic of the effect is desaturation, allied to a lifted contrast and perhaps some form of edge enhancement akin to oversharpening. The variations are endless as the effects are almost always blended into the original image using either the opacity slider or a blending mode.
Use of the effect comes and goes; by definition, if somebody uses it to make their image stand out and then everybody jumps onto the idea then it no longer stands out! However, once you learn to recognise the effect you see that it crops up in fashion magazines and the weekend supplements on a regular basis in both editorial and advertising. There are some hideous examples kicking around; like all tools that have a powerful effect on an image there are those who have no idea that they have gone way over the top. Taylor James (www.taylorjames.com) are particularly good (and subtle) users of the effect and their website should be compulsory reading for anybody interested in following retouching trends. They work for the prominent names in the UK so their work is likely to advertise television programmes and the like.
Bug Fix
One of the things we noticed about installing Nik Color Efex into 32-bit Photoshop (it is not yet available in a 64-bit version) was that the Photoshop Tool Bar was compromised. Specifically, the 'Arrange Documents' icons were missing. This is a glitch but the solution is to go to File>Automate and click Nik Selective Tool; your missing icons then reappear.
There are 0 days to get ready for The Society of Photographers Convention and Trade Show at The Novotel London West, Hammersmith ...
which starts on Wednesday 14th January 2026


Society of International Commercial and Industrial Photographers (SICIP) is a trading name of BPPA Ltd
The Society of Photographers
Clwyd Chambers, Clwyd Street, Rhyl, Denbighshire, LL18 3LA
BPPA Ltd Company Reg 0392 2894
VAT number 790 4289 05
Tel: +44 1745 356935


Home Page - Find a Photographer - Benefits of Membership - Professional Imagemaker Magazine - FREE information pack - Privacy - London Photography Show Europe's Largest 'All-Welcome' Photographic Convention
Newsletter
Subscribe to the Societies Newsletter. Subscribe here.