

.

articles/Monitors/xritei1profiler-page2
by Mike McNamee Published 01/06/2011
The organised, profile-build patch set may be printed directly from the application or saved out as an 'un colour-managed' TIFF file for printing through other software (such as InDesign, Photoshop, Adobe Acrobat PDF or a RIP). This is the area that has caused so much trouble over the past year with the goofed up Apple colour management and the dropping of the 'No Colour Management' option from Adobe CS5. It has been particularly difficult for the making of profiles by paper providers, as their user base does not own the profiling software (which drives the patch printing correctly).
The next step in the workflow (after allowing the print to dry down) is to measure the patches. Automatic machines such as iO and Isis get on with the job unattended, the i1 requires a cradle in which to run the head of the spectro and care to be taken not to drag the feet of the spectro over the print surface. If the cradle does not have a white backing, the print must be placed onto a white backing for measurement, the classic approach being about three sheets of the same substrate paper.
In practice we found the new software to be very much more tolerant of dragging speed and patch size than previous versions, it was, in fact, a dream to use and has transformed our opinion of using the i1. The ease of use also applies later when validating a test target; it was a firsttime-every-time operation on the new software compared with an often frustrating faff previously! This alone makes the cost of an upgrade seem like a good deal!
Moving through the workflow, the next stage is to choose the lighting conditions for profile build. The usual suspects are provided as defaults: the standard D50 along with D55, D65, Tungsen A, plus seven fluorescent variants. You may also set a colour temperature on a sliding scale or measure and input your own ambient viewing conditions. We chose the industry standard D50, always a safe starting point.
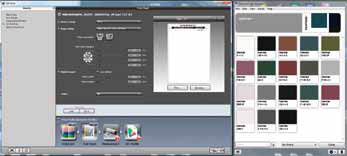
Profile editing has been replaced by a methodology for using additional patches to 'iterate' the profile. Here an additional set of Pantone swatches that are close to out-of-specification colours are used to refine the profile.
Next, the defaults for building the profile are set and this includes the rendering intent, profile quality/size along with an Advanced button which provides profile smoothing (perhaps at the expense of accuracy), a choice of Chromatic Adaptation algorithm (geeks only need apply!) and finally icc profile type. This last setting is important as many Mac installations do not recognise version 4 profiles, in which case you have to make version 2 profiles.
The final act before 'creating and saving' is to give the profile a sensible name. Normally this would include the printer model, ink type, media and setting information. Users should establish and follow a strict naming protocol to prevent mayhem in a few months' time!
There are 0 days to get ready for The Society of Photographers Convention and Trade Show at The Novotel London West, Hammersmith ...
which starts on Wednesday 14th January 2026


Society of International Commercial and Industrial Photographers (SICIP) is a trading name of BPPA Ltd
The Society of Photographers
Clwyd Chambers, Clwyd Street, Rhyl, Denbighshire, LL18 3LA
BPPA Ltd Company Reg 0392 2894
VAT number 790 4289 05
Tel: +44 1745 356935


Home Page - Find a Photographer - Benefits of Membership - Professional Imagemaker Magazine - FREE information pack - Privacy - London Photography Show Europe's Largest 'All-Welcome' Photographic Convention
Newsletter
Subscribe to the Societies Newsletter. Subscribe here.