

.

articles/Cameras/nikon-d810-page3
by Mike McNamee Published 01/02/2016

Bracketing
Of all the functions which camera makers add to devoted buttons on a camera body, Nikon's implementation of bracketing is perhaps one of the
most useful. One push of the 'Bkt' button followed by a couple of notches
on the command dials and you are ready to roll. While this might seem
a trivial advantage over other marques, sometimes fleeting light in the
landscape is just that - with insufficient time to be rolling through menus
on the back of a camera trying to remember which part of the menu that
is required and squinting in difficult sunlight. The shot here is an example,
the light burst through for just a couple of seconds, enough time to set up
and blast a 5-frame sequence on high speed continuous mode for manual
stitching in Photoshop. There are many ways of skinning this particular cat
and we discuss this further in this issue.
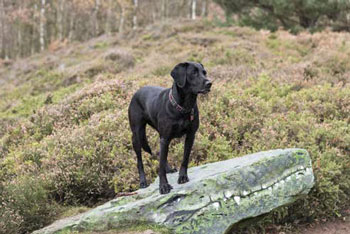
Sharp as a crocodile's tooth! This image was sharpened following the Pixel Genius routine including pre-sharpening in ACR and High Pass Sharpening as described opposite.
Sharpening
Thousands (possibly millions!) of words have been written on the subject
of sharpening digital images. Such is the divergence of views that we
got fed up with all the arm waving and made a Photoshop action to
create an A2 sheet with 12 snippets of a 16x20-inch print at 12 different
sharpening conditions. Over the intervening five years these have been
put before almost 1,000 photographers who were asked to choose
their preference. What this has taught us is that while no two people
always agree between adjacent settings, in the main people home into
particular areas of preference. Thus with High Pass Sharpening methods
(as devised by Pixel Genius) the variation of preferences in opacity of
the High Pass layer lies between 20% and 70%, so there is little logic in
fretting over a choice between say 30% and 35% - the variations need
to be greater than this. We have also found that the preferences are
swayed by both subject matter and the shooting ISO of the image. Thus
for the same sharpening suite of values we have found a 6400 ISO image
wrecked by the higher levels of sharpening but a D800 image left most
people unable to even see a difference across the same value set. For
some time this fooled us into thinking that the D800 required different
sharpening tactics but we have slowly moved our position on this and
the values for the D800 (and so by definition the D810) are actually the
same for the D700 and D800/810 for the same type of subject.
To give you an idea of the strength of variation, the Pixel Genius group
recommend pre-sharpening in Camera Raw followed by Photoshop
sharpening specific to output. Tony Kuyper rejects this work flow totally
and proposes zero sharpening of the Raw processing followed by
sharpening in Photoshop. One thing all agree on is that sharpening is
resolution dependent and so anything you do for a print image will need
to be reined back for a web image. All this serves to do is confuse the
newcomer but we can distil a few things that are definite requirements
while accepting that other methods are successfully used by others.
There are 0 days to get ready for The Society of Photographers Convention and Trade Show at The Novotel London West, Hammersmith ...
which starts on Wednesday 14th January 2026


Society of International Commercial and Industrial Photographers (SICIP) is a trading name of BPPA Ltd
The Society of Photographers
Clwyd Chambers, Clwyd Street, Rhyl, Denbighshire, LL18 3LA
BPPA Ltd Company Reg 0392 2894
VAT number 790 4289 05
Tel: +44 1745 356935


Home Page - Find a Photographer - Benefits of Membership - Professional Imagemaker Magazine - FREE information pack - Privacy - London Photography Show Europe's Largest 'All-Welcome' Photographic Convention
Newsletter
Subscribe to the Societies Newsletter. Subscribe here.