

.

articles/Photoshop/sharpeningcs4acr-page3
by Mike McNamee Published 01/06/2009
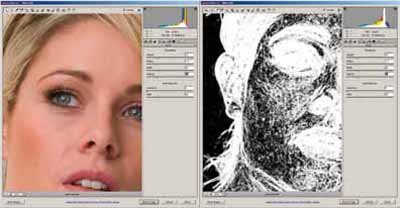
The greyscale indicator is turned on by holding down the Alt key when also moving the sliders at or above 100% zoom.
Sharpening has often been used in conjunction with layer masks to control just where it is applied - typically you might sharpen the trees of a landscape but leave the sky softer and unsharpened (or perhaps less sharpened). Similarly, you might sharpen the eyes and lashes of a model but leave their skin less sharpened (or even softened). A masking facility is now provided as part of the ACR handling procedure of CS4.
One thing that pre-sharpening should strive to do is protect shadows and highlights from damage or, (in the case of shadows), from enhancing any residual noise in an image. This is partly why sharpening should be carried out after any tonal corrections have been applied - so that the sharpening process does not destroy your highlight or shadow quality. You may also need to protect highlights and shadows from any sharpening at all.
Output Sharpening sharp 8
This is sometimes the second phase of sharpening, applied specifically for the intended print output. Hence it might be done after conversion from RGB to CMYK and after an image has been scaled for inclusion in a page layout. An image sharpened for inkjet printing to a matt paper might have more sharpening (ie 'stronger' values) than the same image intended for the greater detail of a full-gloss print. Output sharpening attempts to set the strength of the effect so that you actually produce subtle haloes around edges, but at such a level that they are undetected by the viewer at normal viewing distances and magnifications. Such images will look a little 'crunchy' when viewed in Photoshop at 400% zoom, but may well be OK in the print.
Despite this apparent difficulty, there are certain generalised rules that apply to sharpening, many of the terms used are universal across the various sharpening software and it is possible to spell out reasonable starting values for experimentation.
AMOUNT:
This is like a volume control, the more you apply the louder the effect, and the more pronounced the sharpening becomes. Sharpening makes the lighter side of a boundary lighter and the darker side darker. A higher amount increases the strength of this lightening and darkening either side of a detected edge or boundary. The values for Amount vary from zero to a full 500% depending upon the other settings that are used with it. A more typical range is 50% to 120%.
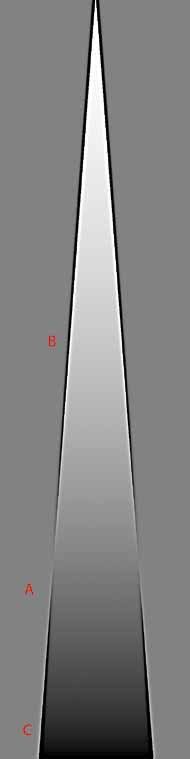
RADIUS:
The radius is the width of the 'line' created by the sharpening. It is measured in pixels and the higher the value, the wider the line (see diagram). There is no direct correspondence between the radius and the actual width of the line, which is why you can set fractional values of a pixel-radius (eg a setting of 0.5 pixels cannot possibly be a half-pixel wide!).
Setting the radius is 'resolution dependent'. In other words you would use a setting of, say 0.3 pixels, on a web image of 1,024 pixel width, but require a larger setting on a larger image of say 5,000 pixels width. In general, radius settings hover either side of a value of 1.0.
There are 0 days to get ready for The Society of Photographers Convention and Trade Show at The Novotel London West, Hammersmith ...
which starts on Wednesday 14th January 2026


Society of International Commercial and Industrial Photographers (SICIP) is a trading name of BPPA Ltd
The Society of Photographers
Clwyd Chambers, Clwyd Street, Rhyl, Denbighshire, LL18 3LA
BPPA Ltd Company Reg 0392 2894
VAT number 790 4289 05
Tel: +44 1745 356935


Home Page - Find a Photographer - Benefits of Membership - Professional Imagemaker Magazine - FREE information pack - Privacy - London Photography Show Europe's Largest 'All-Welcome' Photographic Convention
Newsletter
Subscribe to the Societies Newsletter. Subscribe here.