

.

articles/Photoshop/sharpeningcs4acr-page7
by Mike McNamee Published 01/06/2009
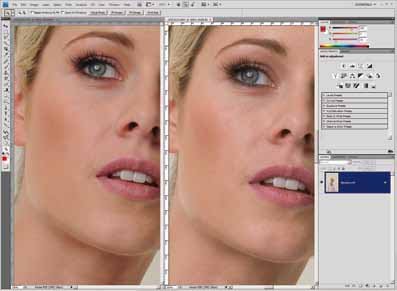
We compared an identical shot taken in both RAW and JPEG with the Nikon D3x. We used 'sharpness- normal' for the JPEG and the Portrait settings from the table, for RAW file. The RAW processing was superior, although it may or may not show in reproduction in the magazine (and take note that if you cannot see the difference there is effectively no difference!).
And then there's the paid-for stuff! A quick trawl on the web produced the list tabled below of sharpening or focus-recovery software. We have tried many of them at Professional Imagemaker - many make boasts that are not substantiated when you get down to it. Many demonstrate rescue jobs that would make a professional photographer blush with shame - probably better to pretend the shot was never taken!
The two which seem to receive the highest accolades are Nik Sharpener Pro and the suite of actions called PhotoKit Sharpener which was originally masterminded by Bruce Fraser and completed, and updated after Bruce's death, by Jeff Schewe. Given that Fraser was collaborating with Adobe to build his methods into Photoshop and that Jeff Schewe completed this task, the methods outlined in the review part of this feature should suffice for most people's needs. When we did some blind testing a few years ago nobody could tell the difference between the various methods, they all worked reasonably well, however.
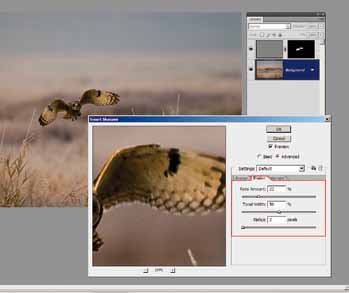
The dialogue box for Smart Sharpen, with the shadow tab open. Not for everyday use the method is worth having in your armoury for a tricky image perhaps shot under less than ideal conditions.
HiRaLoAm Sharpening
The acronym stands for High Radius Low Amount sharpening, a technique which is much loved by the geeky sharpening fraternity and has been greatly promoted by Dan Margulis (who might also be the creator!). The technique consists of using the standard unsharp mask filter but with a massive radius and a very low amount. People have evolved different ways of using the method. Gry Garness (see www.grygarness.com and our review in October 2008) sets the amount to 100 (ie too high), brings the radius up to a high level (around 100), ignoring the contrast but looking for the best modelling, then drop the amount down to 1 and bring it slowly up to the desired level. One additional trick is to highlight the number field (ie so it turns blue) then use 'shift up-arrow' to increment the setting quite quickly, again watching so as to judge the optimum value. In practice, we found the method a bit confusing and certainly not as effective as the latest sharpening in ACR.
There are 0 days to get ready for The Society of Photographers Convention and Trade Show at The Novotel London West, Hammersmith ...
which starts on Wednesday 14th January 2026


Society of International Commercial and Industrial Photographers (SICIP) is a trading name of BPPA Ltd
The Society of Photographers
Clwyd Chambers, Clwyd Street, Rhyl, Denbighshire, LL18 3LA
BPPA Ltd Company Reg 0392 2894
VAT number 790 4289 05
Tel: +44 1745 356935


Home Page - Find a Photographer - Benefits of Membership - Professional Imagemaker Magazine - FREE information pack - Privacy - London Photography Show Europe's Largest 'All-Welcome' Photographic Convention
Newsletter
Subscribe to the Societies Newsletter. Subscribe here.