

.

articles/Photoshop/sharpeningcs4acr-page6
by Mike McNamee Published 01/06/2009
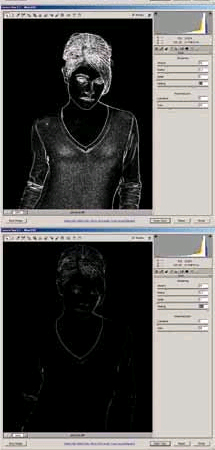
Note the effect of increasing the Masking level in the Detail slider.
The top image is 'as received' and below gradually increasing amounts of Masking are applied. At the top note that the smooth background is protected almost right away and that the skin is already under some protection. In the middle sharpening is prevented on most of the hair but the skin is almost fully protected by now. In the bottom image with the slider full to the right just the major outlines attract any sharpening at all.
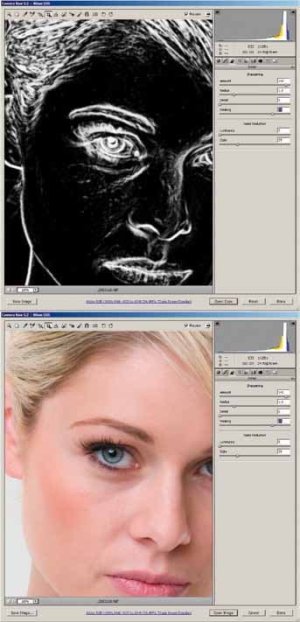
The final result shows the selected setting of 70 for the Masking. This left the model with a slight residual glow on her skin but with sharp eyelashes and facial details such as her lips and nostrils
Smart Sharpen
This is an area where you can control the sharpening specifically within highlights and shadows, as well as deal with motion blur in an image. Controlling shadow sharpening is of particular importance to the wedding photographer if they have been forced into using high ISO setting, which bring increased noise, particularly in shadow areas. However the Smart Sharpen should not be taken as a more clever sharpening method than others - in the wrong hands it can produce quite a lot of artefacts. It is slow in operation and therefore not quite as suited to general workflow sharpening - use with caution and on a selective basis.
There are 0 days to get ready for The Society of Photographers Convention and Trade Show at The Novotel London West, Hammersmith ...
which starts on Wednesday 14th January 2026


Society of International Commercial and Industrial Photographers (SICIP) is a trading name of BPPA Ltd
The Society of Photographers
Clwyd Chambers, Clwyd Street, Rhyl, Denbighshire, LL18 3LA
BPPA Ltd Company Reg 0392 2894
VAT number 790 4289 05
Tel: +44 1745 356935


Home Page - Find a Photographer - Benefits of Membership - Professional Imagemaker Magazine - FREE information pack - Privacy - London Photography Show Europe's Largest 'All-Welcome' Photographic Convention
Newsletter
Subscribe to the Societies Newsletter. Subscribe here.