

.

articles/Photoshop/sharpeningcs4acr-page5
by Mike McNamee Published 01/06/2009
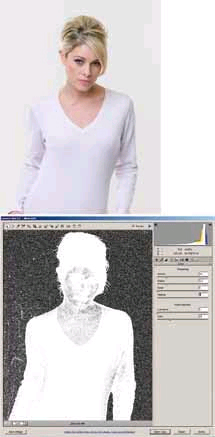
The masking slider acts is an equally sophisticated way. With the slider set hard left, all the image is sharpened. As you move the slider, with the Alt key depressed, you see a gradual build up of black (or dark grey) tones which depict which portions of the image are being protected from sharpening. Thus if you set the value at about 70 on a portrait you are likely to fully protect the smooth areas of skin from over-sharpening artefacts, while leaving eyelashes, and the like, fully sharpened. The method has a clever way of sussing out the underlying structure according to its fine-detail content - very clever indeed! The method is credited to the late, Bruce Fraser. Specimen Conditions
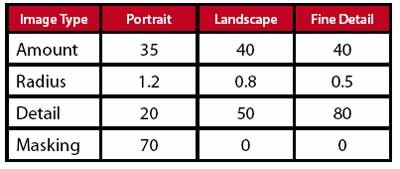
The beginner needs some starting values to punch in as it is difficult to do a ring-around with five variables. In Photoshop for Photographers, Martin Evening suggests the following as starting parameters:Join today and receive a fantastic free gift: Apply here
These may be saved as presets. Click on the disclose button at the top right-hand side of the Detail tab and select 'save settings', select 'sharpening' with its tick box, then 'save'.
We compared an identical shot taken in both RAW and JPEG with the Nikon D3x. We used 'sharpness- normal' for the JPEG and the Portrait settings from the table, for RAW file. The RAW processing was superior, although it may or may not show in reproduction in the magazine (and take note that if you cannot see the difference there is effectively no difference!).
In practice we found these settings very good starting points. We used the portrait settings on a portrait from a Nikon D3x and the Fine Detail settings on Jon Ashton's image of a great tit. The portrait settings were good; for the bird image we brought the masking slider up a few points to protect the background from being sharpened. By comparison, the setting of 70 for the portrait masking protected the skin tones of the model quite well.
We compared an identical shot taken in both RAW and JPEG with the Nikon D3x. We used 'sharpness - normal' for the JPEG and the Portrait settings from the table, for RAW file. The RAW processing was superior, although it may or may not show in reproduction in the magazine (and take note that if you cannot see the difference there is effectively no difference!)
There are 0 days to get ready for The Society of Photographers Convention and Trade Show at The Novotel London West, Hammersmith ...
which starts on Wednesday 14th January 2026


Society of International Commercial and Industrial Photographers (SICIP) is a trading name of BPPA Ltd
The Society of Photographers
Clwyd Chambers, Clwyd Street, Rhyl, Denbighshire, LL18 3LA
BPPA Ltd Company Reg 0392 2894
VAT number 790 4289 05
Tel: +44 1745 356935


Home Page - Find a Photographer - Benefits of Membership - Professional Imagemaker Magazine - FREE information pack - Privacy - London Photography Show Europe's Largest 'All-Welcome' Photographic Convention
Newsletter
Subscribe to the Societies Newsletter. Subscribe here.